Implementation guide
Each Sage 300 Construction and Real Estate data folder will require their own Sage Construction Management instance. If one data folder is used with multiple GL prefixes, you will only need one Sage Construction Management tenant.
You can purchase the AccountingLink for Sage 300 Construction and Real Estate at an additional cost.
Yes, our integration is leveraging the APIs built by hh2. The hh2 Sync Client will need to be installed and configured before the AccountingLink will work.
hh2 officially supports Windows Server 2016 or later for hosting the synchronization client. While Windows 10 is technically unsupported, it may still function. The key requirement is that the environment is Windows-based. However, hh2 cannot guarantee full functionality or support on Windows 10. If issues arise, they may not be resolved due to the unsupported nature of the OS. Installing the synchronization client on Windows 10 can be attempted, but it will be done at your own risk.
You may be able to install and run the synchronization client successfully. However, there is no guarantee of stability or compatibility. hh2 support may be limited or unavailable if issues occur.
For long-term reliability and full support, migrating to a supported Windows Server OS is strongly recommended.
hh2 acts as the integration layer between your local environment and Sage Construction Management. Specifically, hh2 provides the synchronization client used to transfer data between your system and Sage’s cloud-based SCM platform. hh2 does not manage or control Sage Construction Management. hh2’s role is limited to enabling secure and reliable data synchronization.
The hh2 Sync Client has different configurable sync options that will determine how often the data is transferred between each system. It may up to 5 minutes for the quickest option because updates have to go from Sage Construction Management to hh2 Sync Cloud Services to hh2 Sync Client to ERP or vice versa.
We don’t have a way to query the custom formats in the legacy ERPs so these formats will need to be matched manually in Sage CM. If they don’t match formatting, there will be expected issues when sending data with the wrong format (Jobs, Commitments, etc.)
No, we do not have a way to map the payment types now so payment terms should be set up manually to match in each system. Payment terms need to be manually setup on Vendors and Customers.
There shouldn't be any issues. If you have under resourced hardware or potentially large data sets, having both data syncs running simultaneously may put more load on your hardware and result in a change in performance. Deltas are used to minimize this. For large datasets, a Replicator can be used to pull an offline data cache for reporting.
The only endpoint that can post the transaction is the new Job Cost Commitment ones which we can turn on for your test environments and customers. Apart from that, user settings for posting controls are going to dictate the posting behavior.
AP Invoices created through the platform will need to be posted by the user in Accounts Payable. That posting process will create unposted transactions in Job Cost and General Ledger. Depending on posting settings in AP, those General Ledger and Job Cost transactions will either automatically post or the user will need to manually post them in their respective modules.
Direct Cost entries created via the platform will need to be manually posted in Job Cost.
Only the new API for Commitments is there an ability to remotely post the transactions. The control associated with posting would typically be batch numbers and most of the methods we use to get the data into Sage does not provide a response where we can grab the batch numbers for data feeds. The only case where Job Cost Transactions will be automatically posted would be Committed Cost transactions created as a result of creating Commitments through the Commitment API. In all other cases, Job Cost Transactions must be posted by the user. This would include the following types of transactions:
-
Original Estimates
-
Approved Estimate Changes
-
Approved Scheduled Value Changes (OCOs)
-
Direct Costs
-
Misc Worksheet Entries
Named files are not supported. If you have named files enabled for a given type of transaction file, we can specify a single specific file name that we would sync data from. This applies to the following file types only:
-
PR Master
-
PR System
Yes, you can export Labor Timecards in .TXT format using the Time & Expenses module in Sage Construction Management.
See Export Labor Timecards from Sage Construction Management and Import Them in Sage 300 Construction and Real Estate for more details.
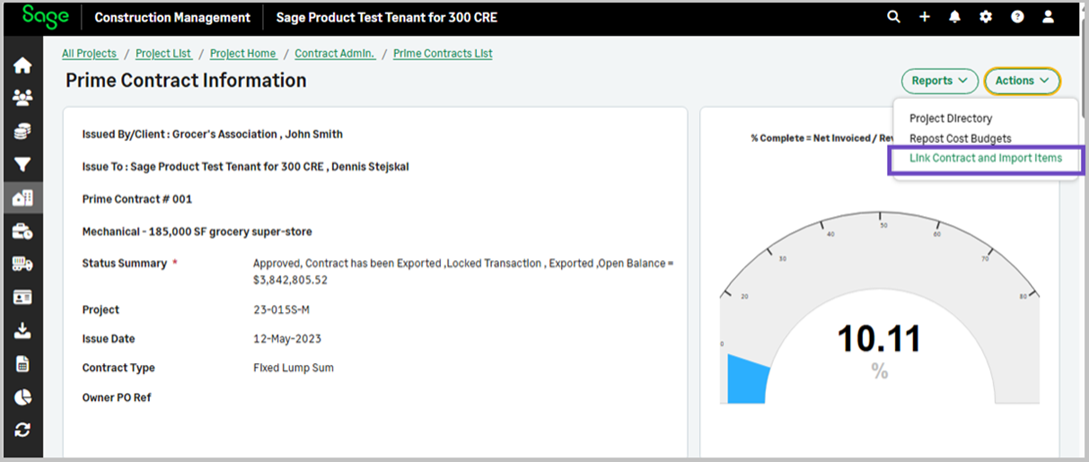
Yes, you can manually link a prime contract and import contract items using the Prime Contract information page links, after selecting a prime contract through the Project module.
See Manually link a prime contract and import contract items.
It is not recommended to set prime contracts and SOV line items using the available integration options since the use of hh2 has introduced complexities that make managing the posted records complicated.
Sage Construction Management creates the project / job record only in Sage 300 Construction and Real Estate and then creates the estimate / cost budget and posts it to Sage 300 Construction and Real Estate. The contract and line items are set up in Sage 300 Construction and Real Estate and then pulled back to Sage Construction Management. Contract and prime invoice line items need to be managed manually. Prime invoices are posted as contract invoices in Sage 300 Construction and Real Estate by line item detail.
To avoid discrepancies that may be caused by manually managing prime and contract invoices, we recommend setting the Sage 300 Construction and Real Estate jobs to default to the QuickBill Invoice settings. Sage Construction Management creates the project / job in Sage 300 Construction and Real Estate. Sage 300 Construction and Real Estate presets the billing method.
A few settings need to be manually added. Prime invoices post in Sage 300 Construction and Real Estate as QuickBill invoices with a basic entry and totals only.
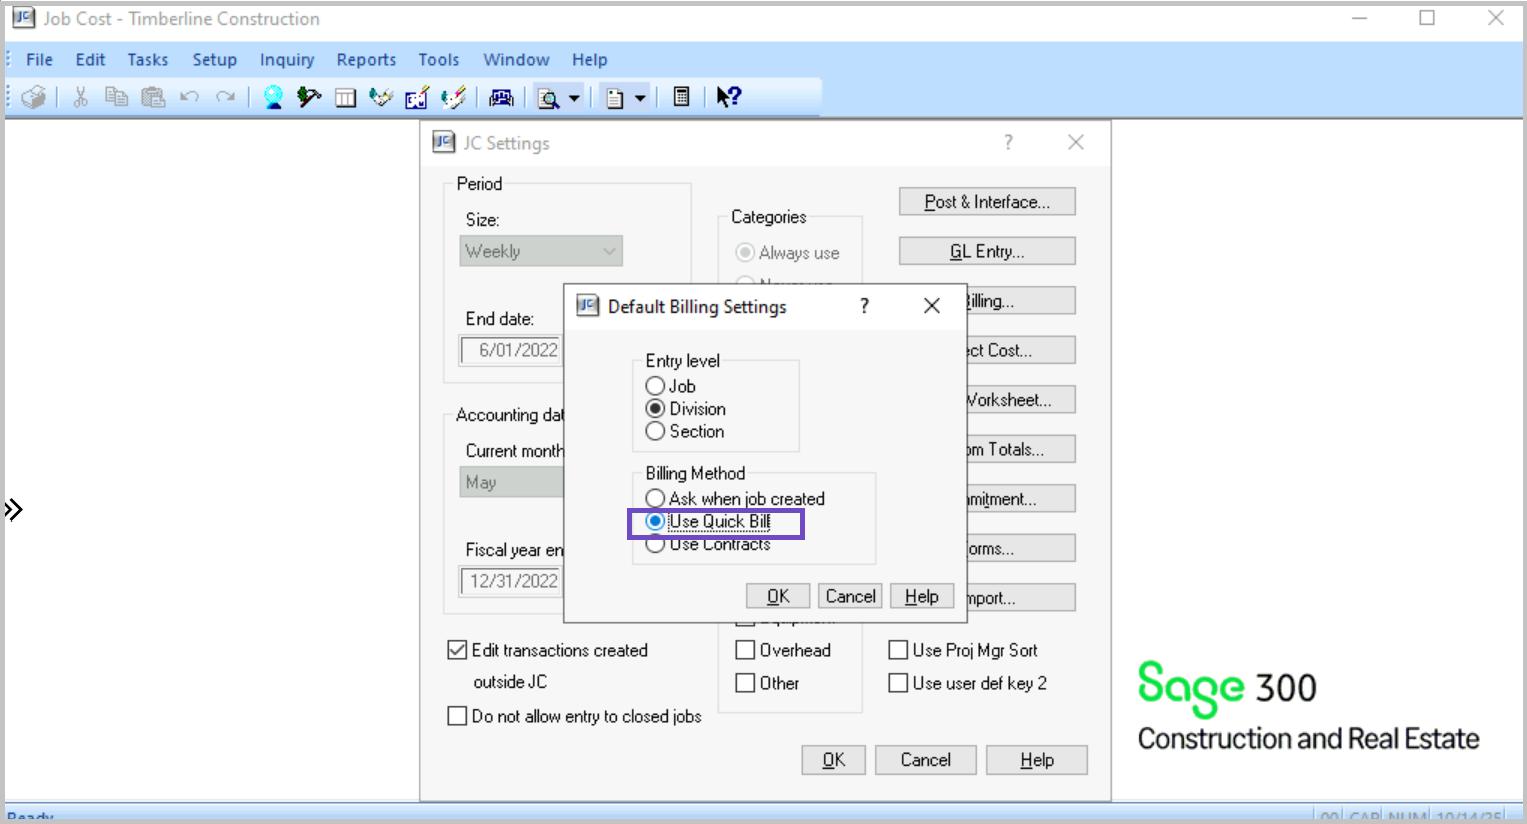
Set the default billing method to QuickBill in Sage 300 Construction and Real Estate
-
Go to Job Cost.
-
Select File > Company Settings > JC Settings > Billing....
-
Select Use Quick Bill > OK to make sure all new jobs will default to QuickBill unless manually overridden.
-
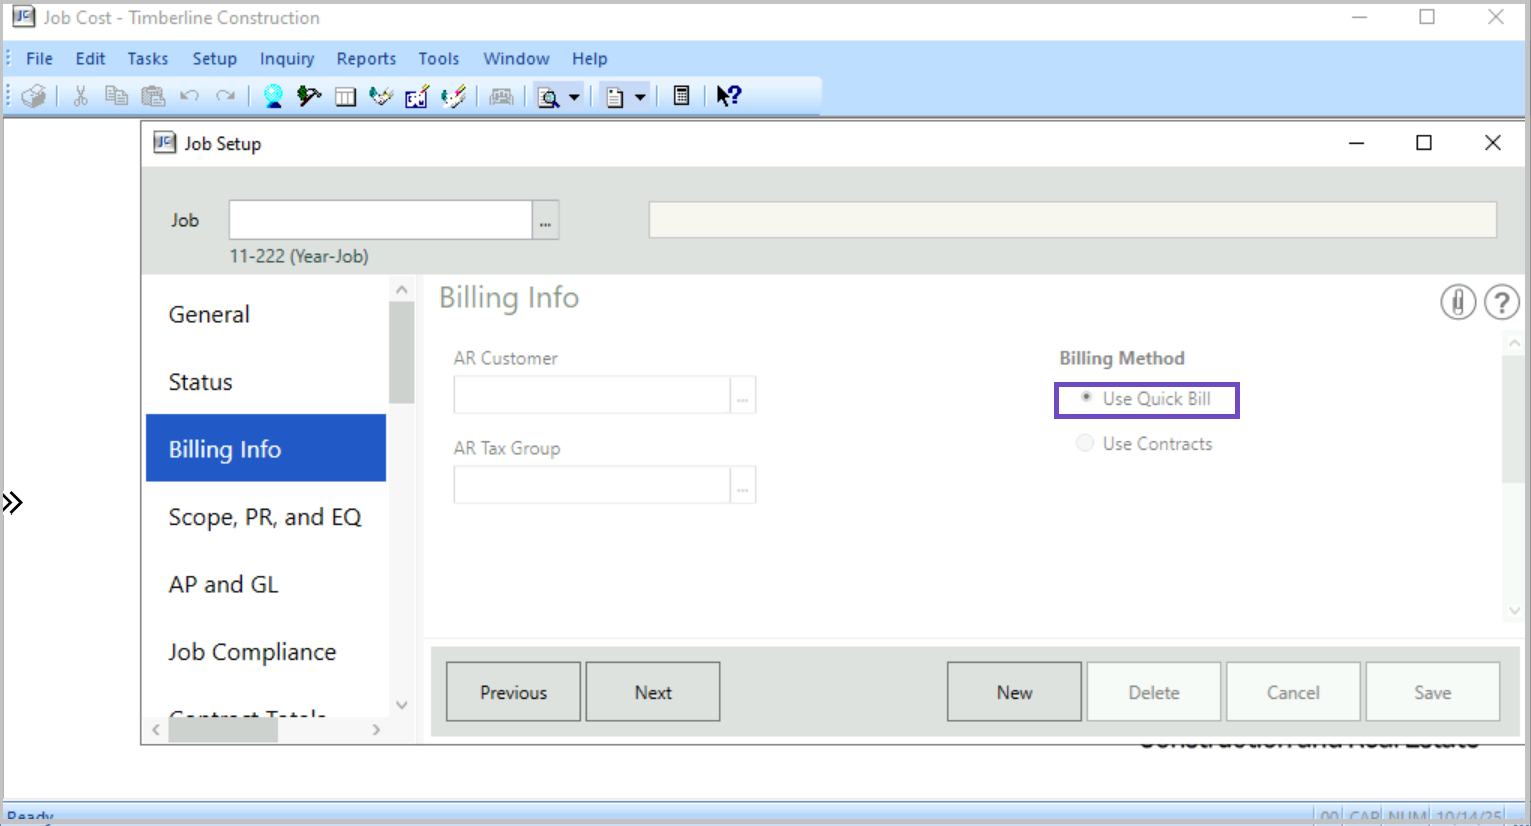
When creating a new job, verify that the billing method defaults to QuickBill. Select Setup > Jobs... > Billing Info. Make sure that the Use Quick Bill radio button is selected at the Billing Method section.
There are various posting status types used in Sage Construction Management when integrating with Sage 300 Construction and Real Estate:
-
Posted: The transaction has been successfully posted in Sage Construction Management and linked to a corresponding purchasing or accounts payable (AP) transaction in Sage 300 Construction and Real Estate. This is the final status, confirming successful integration.
-
Marked as Posted: The transaction was manually marked as posted within Sage Construction Management but is not linked to a Sage 300 Construction and Real Estate transaction. This status helps prevent duplicate entries when a transaction is manually entered in both systems.
-
Not Posted: Transactions eligible for posting that appear in the Posting Wizard but have not yet been processed.
-
Partially Posted: Only part of the transaction has been posted. This status is common in cases involving multiple line items or partial approvals.
-
In Queue: The transaction has entered the posting process via background operations but is not yet complete. This status indicates that asynchronous posting is underway.
-
In Queue (In Progress): A more specific variant of In Queue, indicating that the background posting process is actively running.
-
Posting Failed: The transaction encountered an error during the posting process. Details, including error messages or exceptions, can be found in the Posting Log on the Posting Tab.
-
Discrepancies: The transaction was posted, but the totals between Sage Construction Management and Sage 300 Construction and Real Estate do not match. This status flags mismatches that require reconciliation.
The Vendor Summary report displays payment information based on data synchronized between Sage Construction Management and Sage 300 Construction and Real Estate.
Payment amounts are updated through the following process:
-
A transaction is created in Sage Construction Management, such as a subcontract invoice.
-
The AccountingLink utility or browser solution posts the transaction to Sage 300 Construction and Real Estate.
-
Sage 300 Construction and Real Estate processes payments for the bill or subcontract invoice.
-
The AccountingLink retrieves payment details from Sage 300 Construction and Real Estate and updates the payment information in Sage Construction Management.
For example, for subcontract invoices:
-
The subcontract invoice is created in Sage Construction Management.
-
The AccountingLink posts the subcontract invoice to Sage 300 Construction and Real Estate.
Sage Construction Management stores the associated accounting transaction ID to retrieve payment information later on.
-
When a payment is made in Sage 300 Construction and Real Estate, the AccountingLink retrieves the payment information during the next synchronization.
-
The payment amount is then updated in the Accounting Info section of the subcontract invoice record and becomes available for reporting and analytics.
Payment information is not updated in real time. The Retrieve Payment and Deposit Information from Sage 300 CRE function on the Post tab is responsible for updating payment amounts in Sage Construction Management. This synchronization can be run manually or scheduled to run automatically on a recurring basis.
If payment amounts do not appear in the Vendor Summary report, verify that:
-
The transaction was successfully posted from Sage Construction Management to Sage 300 Construction and Real Estate through the AccountingLink.
Payment information is available only for transactions posted from Sage Construction Management to Sage 300 Construction and Real Estate through the AccountingLink. The posting process creates the relationship needed to match Sage Construction Management transactions with payment records in Sage 300 Construction and Real Estate. If a transaction is entered separately in both Sage Construction Management and Sage 300 Construction and Real Estate, no relationship is created between the records. In this situation, payment information entered in Sage 300 Construction and Real Estate cannot be linked to or displayed for the corresponding transaction in Sage Construction Management. -
Payment has been processed in the accounting system.
-
The Retrieve Payment and Deposit Information from Sage 300 CRE function has completed successfully.
-
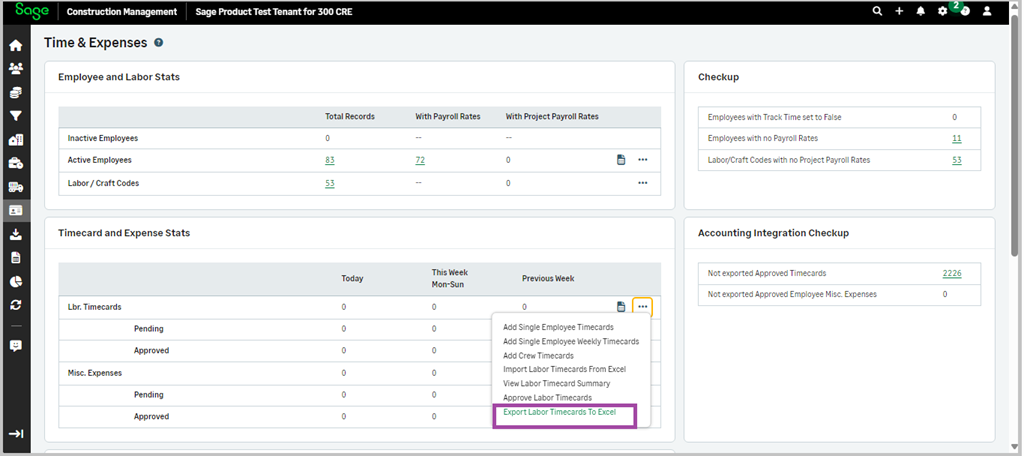
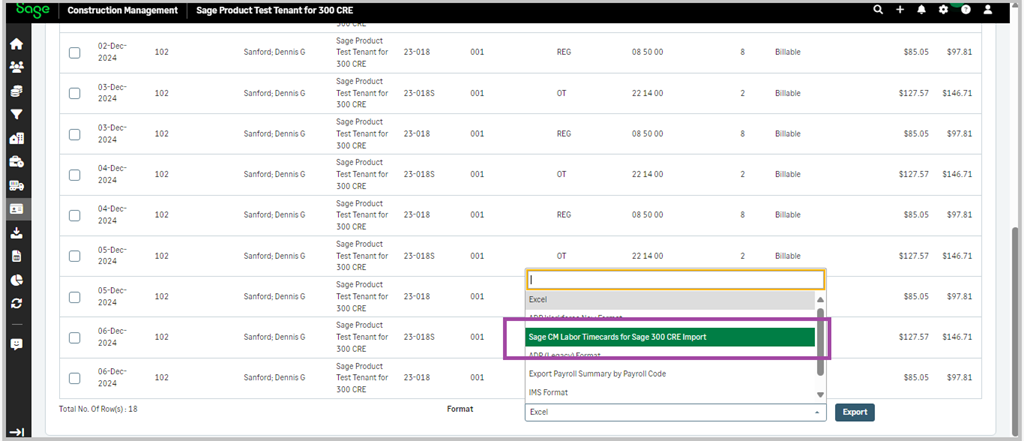
Log in Sage Construction Management and select Time & Expenses.
-
Select the three-dot icon in the Lbr. Timecards row and select Export Labor Timecards To Excel.
-
In the Export Timecard(s) page, select the appropriate Start Date and End Date and select Filter.
-
Select the required timecards.
-
Select Sage CM Labor Timecards for Sage 300 CRE Import in the Format dropdown.
-
Select Export.
The Find button in Import Time in Payroll in Sage 300 Construction and Real Estate requires the file format to be in TXT. You cannot import a CSV file into Payroll.
If you saved the file in CSV format when you exported it from Sage Construction Management, you must convert it back to TXT.
Correct: ,,
Incorrect: , ,
To save the import file as a TXT file:
-
Open the CSV file in a text editor, such as Notepad.
-
Select File > Save As.
-
Select (*.txt) and select Save.
-
Import the TXT file to Payroll in Tools > Import Time.
Alternatively, you can manually enter the file name.
-
Go to Payroll and select Tools > Import Time.
-
Enter the path and file name of the CSV file.
First modify your time entry view in Sage 300 Construction and Real Estate to match the order of the fields in the TXT file that was exported from Sage Construction Management.
- Log in Sage 300 Construction and Real Estate and open the Payroll application.
- Select Tools > Customize Time Entry.
- Enter a View and a Description.
-
Double-click each of the following items in the Time entry columns list in the specified order to add them to the Time entry columns selected list:
- Date
- Employee
- Job
- JC extra
- JC Cost Code
- JC Category
- Certified Class
- Pay ID
- WC Code
- Units
- Rate
- Description
- Select Close.
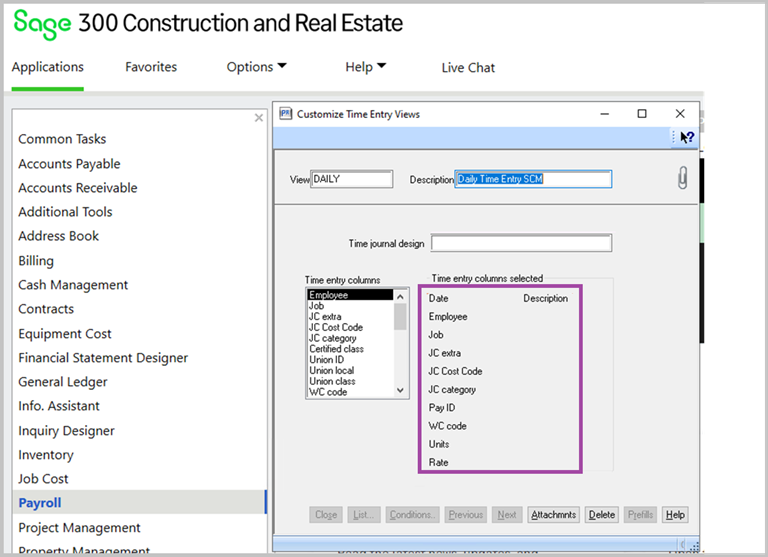
The selected columns are saved in a comma-separated TXT file.
- In Sage 300 Construction and Real Estate, select Payroll >Tools > Import Time.
- Select the Import file field, press F4 to open the list of files ready to import, and select the previously created comma-separated TXT file from the location it has been saved.
- Add a file name in the Error File field, such as ImportErrorsMMDDYY.
Any errors that are generated during the file import are included in the error file.
- Place your cursor in the Time entry view, press F4, and then select the custom view created previously.
- Specify the Period begin date.
- Specify the Period end date, which is a required field.
- Select Start.
- Enter a file name to save the import time journal, such as LaborTimecardImportMMDDYY.
- Select Save.
Next steps
- Check to see if Sage 300 Construction and Real Estate created an error file. If lines from the import do not export correctly from SCM to S300CRE, the rejected records will be stored in the error file. The reasons for the failed imports appear in red on the right side. Save the error file.
The errors are also recorded on the Import Journal so that you can use a text editor from a spreadsheet or word processor to make the appropriate corrections. If you make the appropriate corrections in the error file, make sure to delete the column on the right that shows the reasons for the failed imports before adding the corrected lines in the import journal. After all records are converted, verified and moved to the appropriate file, the Import Journal prints, immediately followed by the Time Journal. - Print or view the Time Journal from Sage 300 Construction and Real Estate to a Sage Construction Management Cross-Project Labor Timecard Detail Log Report from Sage Construction Management.
- Confirm everything imported correctly.
- Check the totals from both reports.
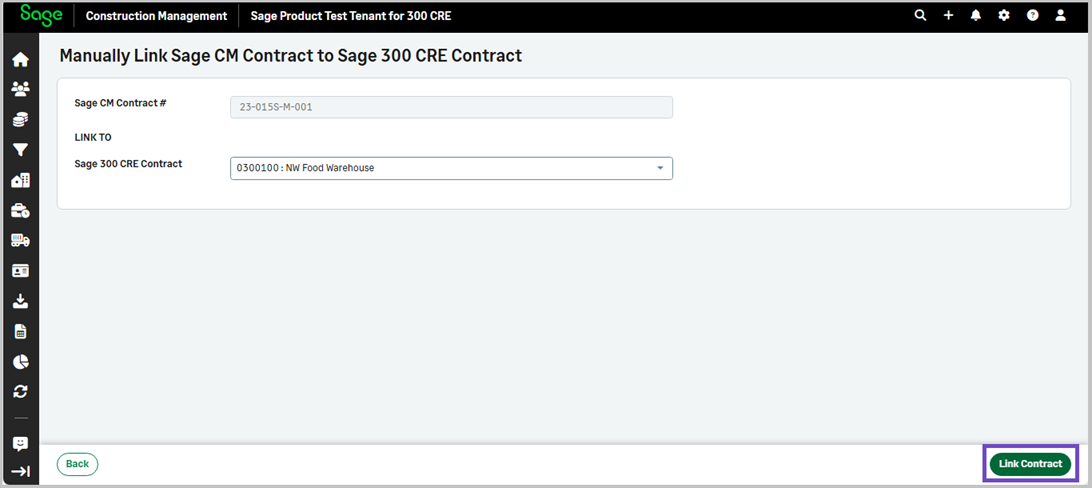
You can link a prime contract and import prime contract items.
-
On the Prime Contract Information page, select Actions > Link Contract and Import Items.
-
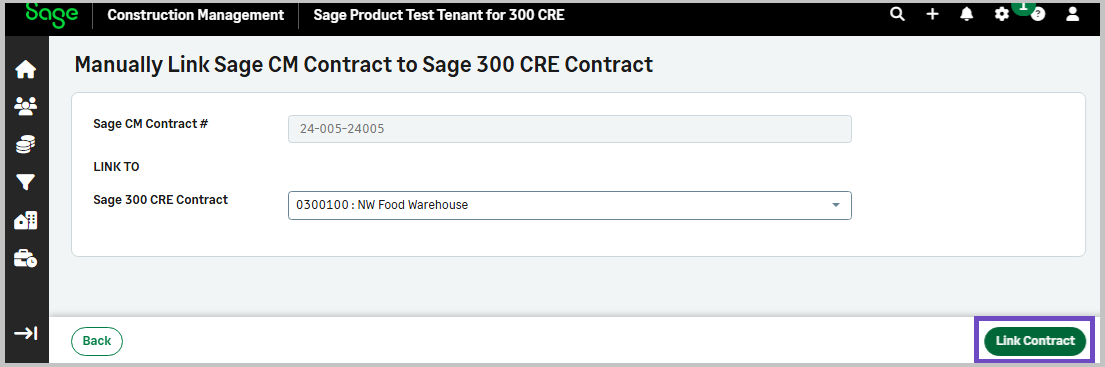
Select a contract from the Sage 300 CRE Contract dropdown and select Link Contract.
-
On the Import Item page, select one of the following:
-
Update Existing or Add New items: Select this option to update existing data for Code, Description, and Amount matching based on the Job Cost Code.
-
Add New Item: Select this option to add a new item.
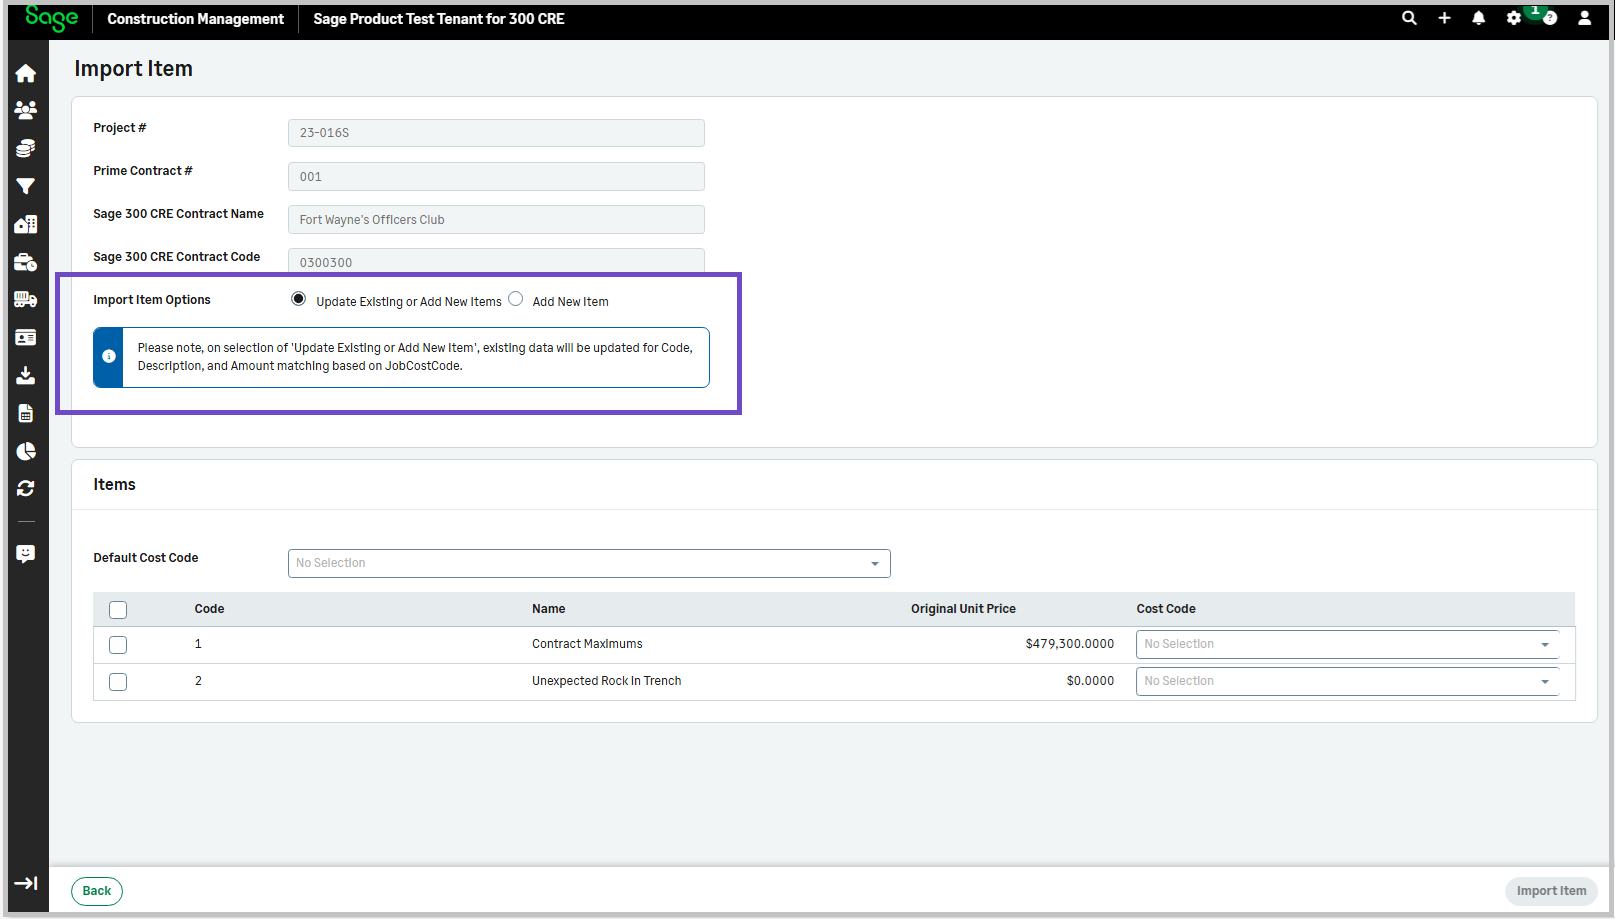
-
-
Select a cost code from the Default Cost Code dropdown and select Import Items.