Set up AccountingLink for Sage Intacct
Related information
Follow the steps below to integrate Sage Intacct with Sage Construction Management.
Set up locations
When you post from Sage Construction Management to Sage Intacct, you'll need to select an entity and a location.
Make sure that the location that you're going to post to is set up in Sage Intacct.
For more information, see Locations in the Intacct Help Center.
Set up Web Services
Enable Web Services and create a sender ID and a Web Services user.
Make sure you're in the top level.
-
Go to Applications > Company > Admin > Subscriptions.
-
Scroll to the Web Services section near the bottom and turn on the subscription.
-
Go to Applications > Company > Setup > Company.
-
Select Edit.
-
On the Security tab, find the Web Services authorization section.
-
Select Add.
-
In the Web Services sender information screen, enter the following information exactly as shown:
-
Sender ID: SageCM
The ID is case-sensitive and must match exactly. -
Description: Sage Construction Management
-
Status: Active
-
-
Select Save and then on the Company Information screen, select Save again.
Create a Web Services user account at the top level with full permissions to Sage Intacct. This user account is used when connecting Sage Construction Management to your Sage Intacct company.
-
Go to Applications > Company > Admin tab > Web Services users.
-
Select Add.
-
Enter the following information:
-
User ID: SageCM
-
Username: SageCM
-
Last name: User
-
First name: Sage CM
-
User type: Business
-
Admin privileges: Full
-
Email: Enter an email address for the Sage Intacct admin.
-
-
Depending on whether the company is set up for role-based or user-based permissions, assign roles or permissions necessary so that the user has access to all features in Sage Intacct.
If the user is not set up with full permissions, Sage Construction Management will not have access to all of the Intacct data, which will cause integration issues.
For more information, see the following articles in the Sage Intacct Help Center:
Add terms
If you haven't already, add terms in Accounts Payable and Accounts Receivable. Duplicate and edit existing terms to save time.
The following is an example of duplicating an existing Accounts Payable term to add a new one.
-
Go to Applications > Accounts Payable > Setup > More > Terms.
-
Find Net 30 in the list and select Edit.
-
Select Duplicate.
-
Enter the following information:
-
Name: Net 60
-
Description: Net in 60 days from bill date
-
Due Day: 60 From invoice or bill date
-
-
Select Save.
-
Create another duplicate of the Net 30 term.
-
Enter the following information:
-
Name: Net 90
-
Description: Net in 90 days from bill date
-
Status: Active
-
Due Day From invoice or bill date
-
-
Select Save.
The following is an example of duplicating an existing Accounts Receivable term to add a new one.
-
Go to Applications > Accounts Receivable > Setup > More > Terms.
-
Locate Net 60 and select Edit.
-
Select Duplicate.
-
Enter the following information:
-
Name: Net 90
-
Description: Net in 90 days from bill date
-
Status: Active
-
Due Day: 90 From invoice or bill date
-
-
Select Save.
Set up a transaction definition
Set up a transaction definition for Sage Construction Management workflows.
If you already have a transaction definition for a Purchasing invoice, you can duplicate it and modify it as needed to save time. Don't worry if you're starting from scratch; we provide all of the information that you need.
Follow the instructions below to set up a transaction definition for a non-commitment vendor invoice.
-
Make sure that you're working in the top level.
-
Go to Applications > Purchasing > Setup > More > Transaction definitions.
-
Search for a transaction definition for a Purchasing invoice (under Purchase Order).
-
If you have this transaction definition, select Edit and then select Duplicate.
-
If you do not have this transaction definition, select Add.
-
-
On the General tab, enter the following information:
-
Template name: Non-commitment vendor invoice
-
Description: Non-commitment vendor invoice
Note that you can use any name, but make a note of what you use. You'll need this information when you're setting up the integration in Sage Construction Management.
-
Template type: Invoice
-
Workflow category: Invoice
-
Reporting category: Purchase order invoices
-
Numbering sequence: Select Add and create a new numbering sequence for Accounts Payable bills using the following settings:
-
Sequence ID: AP Bills
-
Sequence type: Numeric
-
Numeric sequence length: 6
-
Fixed prefix: APB
-
Separator: -
-
Primary sequence: 1
-
Next unused value: 1
-
-
Inventory Control: No changes are needed in the this section. The grid should be empty.
-
Transaction posting: Accounts Payable
No other changes are needed on the General tab.
-
-
On the Posting configuration tab, select the accounts payable credit account and the debit account for the following GL item groups:
-
Materials
-
Labor
-
Equipment
-
Subcontract
-
Other
-
-
Keep the default settings on the Security configuration and Entity settings tabs.
-
Select Save.
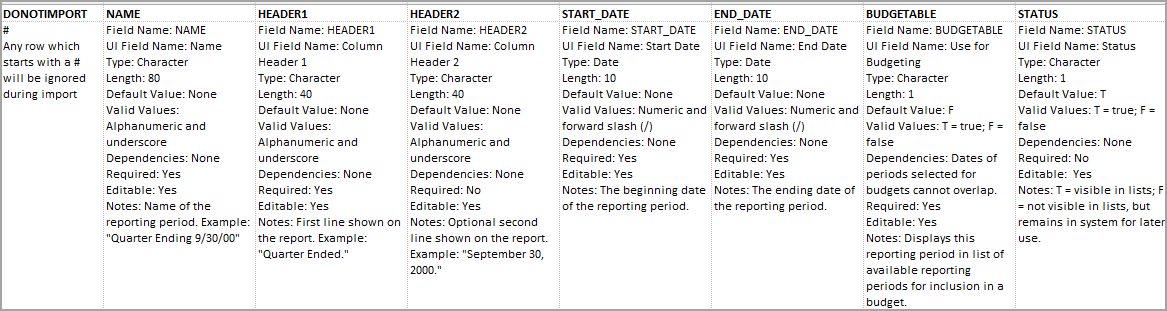
Set up reporting periods
You can set up reporting periods in the future.
Download a new blank import template from the Company Setup Checklist, set up the required accounting periods, and import your data into Sage Intacct.
-
Go to Company > Setup > Configuration > Import data.
The Company Setup Checklist opens. You’ll find a list of areas that you can import information into Sage Intacct.
-
Select the Template link associated with the Reporting periods.
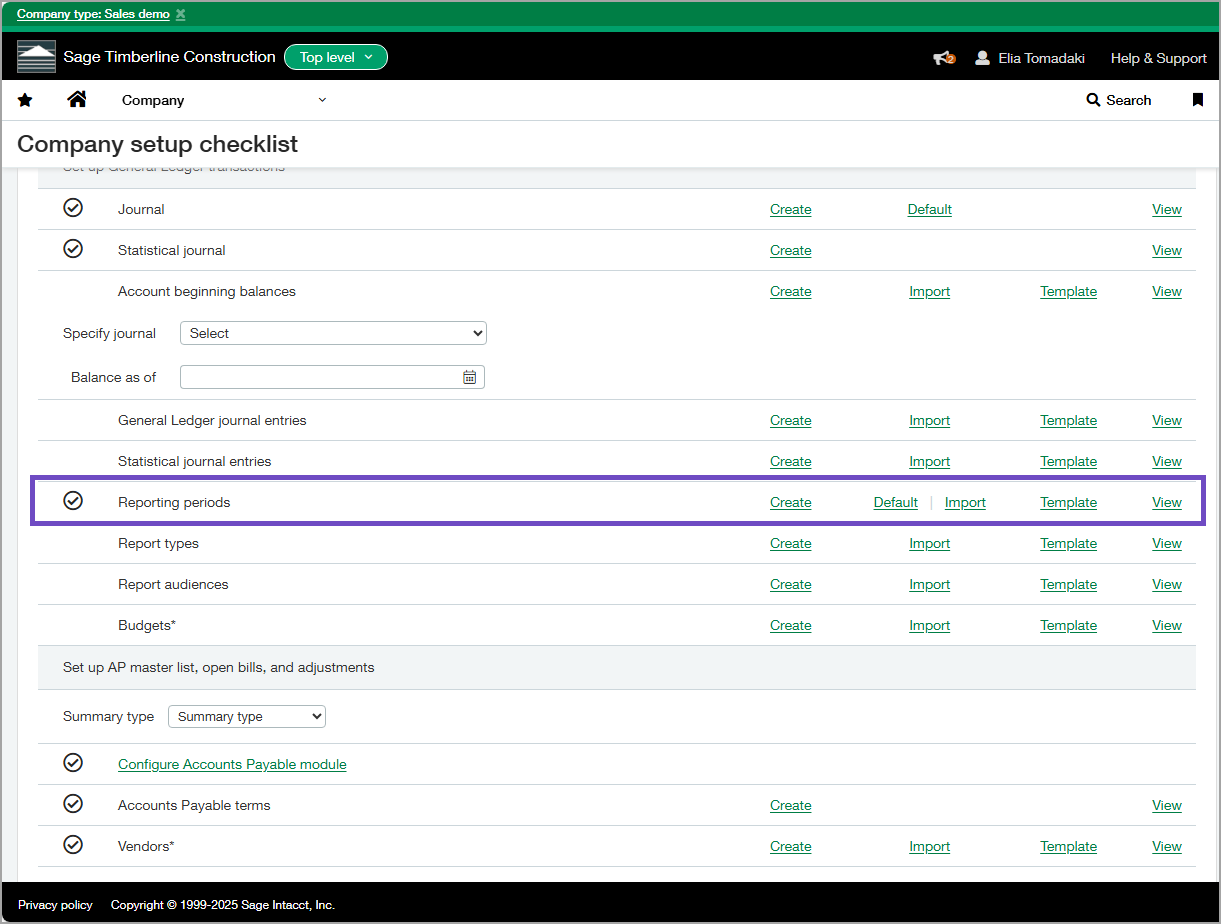
-
Open the downloaded template, enter information in the appropriate fields to set up the required reporting periods, and save your changes.
-
Select the Import link associated with the Reporting periods and import the saved template.
Data setup recommendations
Review the Sage Intacct data setup recommendations.
Set up AccountingLink
The AccountingLink is compatible with the following browsers:
-
Google Chrome (recommended)
-
Microsoft Edge
-
Mozilla Firefox
Implement only new projects in Sage Construction Management.
 Sage Construction Management End User License Agreement for Software.
- Log in to Sage Construction Management using the Sage Construction Management Admin user account.
- Select Settings (
 ).
). - Go to Company Settings > Profile and find the External Applications section.
- In the Accounting application field, select Sage Intacct.
- Select Save.
- Log out of Sage Construction Management and close the browser.
- Open the browser and log in to Sage Construction Management.
- On the left navigation menu, select Accounting Link.
-
Connect to Sage Intacct using your company ID and the credentials for the Web Services user account that you created earlier.
If the connection to Sage Intacct is successful, the AccountingLink main menu appears.
- Select Posting Preferences and update all posting preferences. You must complete this before running the posting wizard.
- Select Save.