Business processes for client change management
The following steps are applicable when your client asks for pricing on a change request before proceeding.
- Create a change proposal request (CPR) and document the following:
- Subject and scope of work change.
- Impacted vendor items.
- Official proposed items.
- Status set to Draft, Pending Submission, or Pending.
- Print the CPR for the owner review after all the details are finalized.
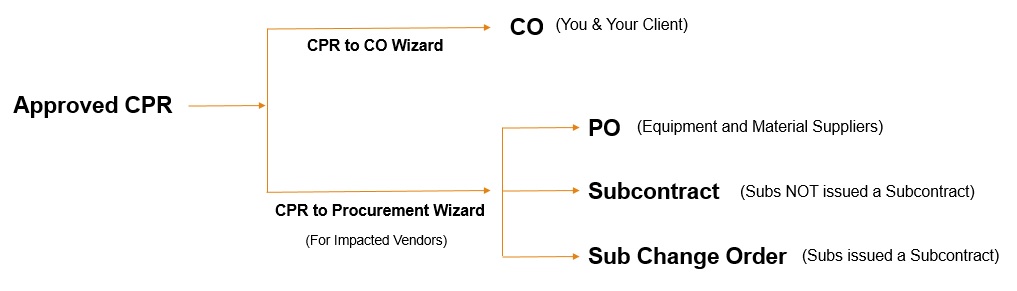
- Run the CPR To CO wizard to merge one or more approved CPRs into a single change order (CO).
- Print the CO for the owner to review and approve.
- Run the CPR To Procurement wizard to create purchase orders (POs), subcontracts, and/or subcontract change orders (SCOs) for the vendor impacted items.
The following steps are applicable after a client approves payment for a change order.
- Create a prime contract CO (not a CPR) and enter the subject and scope of work change.
- Mark the CO as Approved with a Status Date.
- Reference the CO on POs, bills, subcontracts, SCOs, and timecards that the CO impacts.
- After the work has been completed, open the CO and select the Proposed Items link.
- Select Import and import the expenses from Step 3.
- Print the CO details report for owner approval.
The following steps are applicable when allowance items are included in a Sage Construction Management estimate, which was used for the setup of the prime contract.
- Line items or materials where details on plans and specs are not specific enough have the allowance field checked.
-
Estimate calculations summarize cost and sell values per cost code, including the portion attributed to allowances. Both consider hidden and distributed global markups.
Contract Admin Setup wizard
It's used initially when a project is awarded.
- Creates the job cost codes using estimate cost codes.
- Creates the prime contract.
- Creates the original contract items using either the Summary by Job Cost Code or Estimate Line Items option.
Both will include allowance items and values.
- Creates the cost and hour budgets per job cost code.
Both will include allowance items and values.
- Creates the allowance package for each estimate cost code with a total greater than zero.
- Adds estimate line items (items with the Allowance field selected) to the appropriate allowance package.
Add allowance package item options
The Contract Admin Setup wizard will not create allowance item options, so this must be done after the package has been created.
- Open the allowance package.
- Select the allowance item.
- Add item options for the client to select through the TeamLink Portal.
You can also import options from the work items list.
- Send the allowance package response request email to the client using the Actions dropdown.
Client selections through the TeamLink portal
- The client logs in to the TeamLink portal to review the allowance package.
- The client selects the allowance items to review the available options and makes a selection.
- The client reviews the Financial Summary section that shows the allowance items vs their selected options.
Create a CO from the allowance package
- The allowance package is locked so no changes can be made through the TeamLink Portal.
- The CO is created using the allowance package.
- The CO's Proposed Items sub-table will include the following:
- Original allowance items with negative values.
- Selected options.
- The CO subtotal will reflect the variance between the allowance and the selected items.
Create POs, subcontracts, or SCOs for the selected items
- Use the CO as source to create POs, subcontracts, or SCOs for the selected items.